linux学习笔记之常用基础命令及工具操作
主要内容:包括输入/输出重定向、管道、文件搜索、文件行数字数统计、过滤、排序、比较、去重、拼接、压缩、环境变量、历史操作、命令行表达式、数学运算、逻辑运算、shell及子shell、系统监视、进程控制、计划任务、设备文件、文件系统等。
Linux中的应用工具
Linux中的应用工具分为三种:交互工具,过滤器,编辑器
输入:过滤器的数据来源 输出:过滤器的数据去向 重定向:标准输入、输出与错误输出,都可用特定符号改变数据来源或去向。
标准输入、标准输出、标准错误输出,例:
[root@redhat root]# ls -l /dev/std*
lrwxrwxrwx 1 root root 17 2011-10-25 /dev/stderr -> ../proc/self/fd/2
lrwxrwxrwx 1 root root 17 2011-10-25 /dev/stdin -> ../proc/self/fd/0
lrwxrwxrwx 1 root root 17 2011-10-25 /dev/stdout -> ../proc/self/fd/1
以上分别人标准输入(stdin(0))、标准输出(stdout(1))、标准错误输出(stderr(2)),所指向的文件。
输入重定向:
使用”<”来重定向输入源,大多数据工具都会以其后的文件名作为输入源,例:
[root@redhat a]# cat test.txt
HELLO WORLD !
I AM LUOWEI !
WELCOME TO LINUX'S WORLD !
[root@redhat a]# tr 'A-Z' 'a-z' < test.txt     将test.txt文件中的内容中的大写改变成小写输出
hello world !
i am luowei !
welcome to linux's world !
[root@redhat a]#
从当前文档输入:使用 « 让系统将一次键盘的全部输入,先送入虚拟的”当前文档”,再一次性输入。 需要一对字母、符号或字符串作为起始终结符。可以选择任意符号作为起始终结标识符。例:
[root@redhat a]# cat test2.txt
[root@redhat a]# cat > test2.txt <<!
> this is test.
> writted by luowei !
> !
[root@redhat a]# cat test2.txt
this is test.
writted by luowei !
[root@redhat a]#
输出重定向:
例:
[root@redhat a]# ls -l > test3.txt     将输出的内之余输出到test3.txt文件中
[root@redhat a]# cat test3.txt
总用量 20
drwxrwxr-- 2 root root 4096 10月 25 00:32 a_dir
drwxr-xr-x 2 root root 4096 10月 25 00:32 b_dir
-rw-rw-r-- 1 root root 34 10月 25 01:14 test2.txt
-rw-r--r-- 1 root root 0 10月 25 01:17 test3.txt
-rw-r--r-- 1 root root 206 10月 25 01:04 test.txt
请尝试执行'ls --help'来获取更多信息。
[root@redhat a]# ls --help >>test3.txt
[root@redhat a]# cat test3.txt         把输出的内容追加到test3.txt
总用量 20
drwxrwxr-- 2 root root 4096 10月 25 00:32 a_dir
drwxr-xr-x 2 root root 4096 10月 25 00:32 b_dir
-rw-rw-r-- 1 root root 34 10月 25 01:14 test2.txt
-rw-r--r-- 1 root root 0 10月 25 01:17 test3.txt
-rw-r--r-- 1 root root 206 10月 25 01:04 test.txt
用法:ls [选项]... [文件]...
列出<文件>的信息 (默认为目前的目录)。
如果不指定 -cftuSUX 或 --sort 任何一个选项,则根据字母大小排序。

长选项必须用的参数在使用短选项时也是必须的。
-a, --all 不隐藏任何以 . 字符开始的项目
-A, --almost-all 列出除了 . 及 .. 以外的任何项目
………….
[root@redhat a]# ls-l 2>test.txt 将标准错误输出到文件中,在">"符号前加个"2"
[root@redhat a]# cat test.txt
-bash: ls-l: command not found
[root@redhat a]# su - luowei
[luowei@redhat luowei]$ find /etc -name passwd > stdout
find: /etc/sysconfig/pgsql: 权限不够
find: /etc/default: 权限不够
find: /etc/httpd/conf/ssl.crl: 权限不够
find: /etc/httpd/conf/ssl.crt: 权限不够
find: /etc/httpd/conf/ssl.csr: 权限不够
find: /etc/httpd/conf/ssl.key: 权限不够
find: /etc/httpd/conf/ssl.prm: 权限不够
find: /etc/cups/certs: 权限不够
[luowei@redhat luowei]$ cat stdout
/etc/passwd
/etc/pam.d/passwd
[luowei@redhat luowei]$ find /etc -name passwd 2>stderr
/etc/passwd
/etc/pam.d/passwd
[luowei@redhat luowei]$ cat stderr
find: /etc/sysconfig/pgsql: 权限不够
find: /etc/default: 权限不够
find: /etc/httpd/conf/ssl.crl: 权限不够
find: /etc/httpd/conf/ssl.crt: 权限不够
find: /etc/httpd/conf/ssl.csr: 权限不够
find: /etc/httpd/conf/ssl.key: 权限不够
find: /etc/httpd/conf/ssl.prm: 权限不够
find: /etc/cups/certs: 权限不够
[luowei@redhat luowei]$
双重定向输入输出
例:
[luowei@redhat luowei]$ find /etc -name passwd 2> stderr > stderr > stdout
[luowei@redhat luowei]$ cat stderr
find: /etc/sysconfig/pgsql: 权限不够
find: /etc/default: 权限不够
find: /etc/httpd/conf/ssl.crl: 权限不够
find: /etc/httpd/conf/ssl.crt: 权限不够
find: /etc/httpd/conf/ssl.csr: 权限不够
find: /etc/httpd/conf/ssl.key: 权限不够
find: /etc/httpd/conf/ssl.prm: 权限不够
find: /etc/cups/certs: 权限不够
[luowei@redhat luowei]$ cat stdout
/etc/passwd
/etc/pam.d/passwd
[luowei@redhat luowei]$ ls
stderr stdout test.txt
[luowei@redhat luowei]$
将正确定的输出信息与错误的信息输出到同一个地方(文件)
[luowei@redhat luowei]$ find /etc -name passwd &> allout
[luowei@redhat luowei]$ cat allout
find: /etc/sysconfig/pgsql: 权限不够
/etc/passwd
find: /etc/default: 权限不够
/etc/pam.d/passwd
find: /etc/httpd/conf/ssl.crl: 权限不够
find: /etc/httpd/conf/ssl.crt: 权限不够
find: /etc/httpd/conf/ssl.csr: 权限不够
find: /etc/httpd/conf/ssl.key: 权限不够
find: /etc/httpd/conf/ssl.prm: 权限不够
find: /etc/cups/certs: 权限不够
使用 &> 也可所有的输入都送到同一个地方
[luowei@redhat luowei]$ find /etc -name passwd &> allout > allout 2>&1
[luowei@redhat luowei]$
管道
使用 | 将前现代战争过滤器的输出直接送入后一个过滤器的输入。
例:
允许多重管道
注意管道前过滤器的输出与管道后过滤器的输入数据类型匹配。
例:
[root@redhat root]# ls -l /etc |more 列出目录并实现翻页的效果
[root@redhat root]# ls -l /etc |more |grep fstab         使用多重管道
拷贝
[root@redhat root]# echo "hello" > filea
[root@redhat root]# cat filea
hello
[root@redhat root]# touch fileb
[root@redhat root]# cat < filea > fileb        把filea里的内容拷贝到fileb
[root@redhat root]# cat fileb
hello
[root@redhat root]#
将多个文件的内容输出合并到同一个文件
[root@redhat root]# cat filea;cat fileb         查看两个文件的内容
hello
hello
[root@redhat root]# cat filea fileb > file    将filea与fileb的内容输出到file
[root@redhat root]# cat file
hello
hello
[root@redhat root]# echo "hello luowei" > fileb
[root@redhat root]# cat file* > file            将当前目录下以file打头的文件内容输出到file
cat: file: input file is output file
[root@redhat root]# cat file
hello
hello luowei
[root@redhat root]#
文件查找与文件管理
可执行文件的搜索
Which whereis 指令. 例:
[root@redhat root]# which ls         显示ls的完整路径
alias ls='ls --color=tty'
/bin/ls
[root@redhat root]# echo $PATH    系统路径
/usr/local/sbin:/usr/local/bin:/sbin:/bin:/usr/sbin:/usr/bin:/usr/X11R6/bin:/root/bin
[root@redhat root]# alias ls 指示了指令ls --color=tty别名为ls
[root@redhat root]# whereis ls        显示ls的路径及该文件的一些相关帮助信息
ls: /bin/ls /usr/share/man/man1/ls.1.gz
[root@redhat root]#
Slocate 指令 显示含有关键字的所有文件名以及所在路径包含有关键字的文件与目录都会显示。
[root@redhat root]# ls -l /usr/bin/locate
lrwxrwxrwx 1 root slocate 7 10月 25 00:57 /usr/bin/locate -> slocate
[root@redhat root]#slocat passwd
/var/lib/menu/kde/Applications/Preferences/redhat-userpasswd.desktop
/var/www/manual/programs/htpasswd.html
/etc/sysconfig/yppasswdd
/etc/passwd
……
find [路径] [参数]
从指定路径下递归向下搜索文件
支持按照各种条件方式搜索
支持对搜索到的文件进一步用指定操作
例:
[root@redhat root]# find /root -user root        在root目录下查找拥有者是root的文件
[root@redhat root]# find /etc -user luowei        在ect目录下查找拥有者是luowei的文件
[root@redhat root]# find /etc -name services    在ect目录下查找文件名是services的文件
[root@redhat root]# find /etc -size +1000k        在ect目录下查找文件大于1000k的文件
[root@redhat root]# find /etc -size -1000k        在ect目录下查找文件小于1000k的文件
[root@redhat root]# find /root -type f            在ect目录下查找正规的文件
[root@redhat root]# find /dev -type b            在ect目录下查找块设备文件
[root@redhat root]# find /dev -type l                在ect目录下查找链接文件
[root@redhat root]# find /dev -type c            在ect目录下查找字符文件
[root@redhat root]# find /etc -nouser            在ect目录下查找没有拥有者文件
[root@redhat root]# find /etc -nogroup            在ect目录下查找没有群组文件
[root@redhat root]# find /home -perm 0644    的/home目录下查找权限是读写读读的文件
[root@redhat root]# su - luowei
[luowei@redhat luowei]$ mkdir test
[luowei@redhat luowei]$ cd test
[luowei@redhat test]$ touch 6000            创建文件名为6000的文件
[luowei@redhat test]$ touch 2000            创建文件名为2000的文件
[luowei@redhat test]$ touch 6600            创建文件名为6600的文件
[luowei@redhat test]$ touch 4000            创建文件名为4000的文件
[luowei@redhat test]$ ls
2000 4000 6000 6600
[luowei@redhat test]$ chmod 2000 2000        给2000文件设置了gid
[luowei@redhat test]$ chmod 4000 4000     给4000文件设置了uid
[luowei@redhat test]$ chmod 6000 6000     给6000文件设置了gid和uid
[luowei@redhat test]$ chmod 6600 6600     给6600文件设置了gid和uid
[luowei@redhat test]$ ls -l
总用量 0
------S--- 1 luowei luowei 0 10月 26 00:24 2000
---S------ 1 luowei luowei 0 10月 26 00:24 4000
---S--S--- 1 luowei luowei 0 10月 26 00:24 6000
-rwS--S--- 1 luowei luowei 0 10月 26 00:24 6600
[luowei@redhat test]$ find /home/luowei/test -perm 6000     查找权限为6000的文件
/home/luowei/test/6000
[luowei@redhat test]$ find /home/luowei/test -perm -6000        加'-' 表示查找文件权限与6000相与运算后权限仍为6000的文件
[luowei@redhat test]$ find /home/luowei/test -perm +6000    加'+' 表示查看文件权限与6000相或运算后权限仍为这个文件的权限的文件
操作找到的文件
语法:
    -find [路径] [参数]
    -exec 指令 {} \;
    -{} 代表find找到的文件
    -\ 禁止转意
    -; 表示本行指令结束
例:
[root@redhat root]# find /home/luowei/test -perm 6000 -exec chown test1.test {} \;
在/home/luowei/test目录下找权限为6000的文件,并将它改为test组下的test1用户
[root@redhat root]# ls -l /home/luowei/test
总用量 0
------S--- 1 luowei luowei 0 10月 26 00:24 2000
---S------ 1 luowei luowei 0 10月 26 00:24 4000
---S--S--- 1 test1 test 0 10月 26 00:24 6000
-rwS--S--- 1 luowei luowei 0 10月 26 00:24 6600
常用的文件操作指令.
wc
统计文件中的行数,字数,占用字节数
例:
[root@redhat root]# wc test1.txt
8 40 149 test1.txt
8表示这个文件中的字符行数,40表示这个文件中的字数,149表示这个文件所占用的字节数,最后一个是文件名
grep
显示文件中匹配关键字的行
例:
[root@redhat root]# grep "2011" test1.txt     显示test1.txt文件中含有"2011"的行
十月 2011
[root@redhat root]# grep -n "2011" test1.txt     显示test1.txt文件中含有"2011"的行及行号
1: 十月 2011
[root@redhat root]# grep -v "2011" test1.txt     显示test1.txt文件中不含有"2011"的行
日 一 二 三 四 五 六
1
2 3 4 5 6 7 8
9 10 11 12 13 14 15
16 17 18 19 20 21 22
23 24 25 26 27 28 29
30 31
Sort
按序重排文本并送回显示
例:
[root@redhat root]# sort -t: -k3 /etc/passwd 以冒号为分隔,对第3栏进行排序
diff
报告文本差异内容
例:
[root@redhat root]# diff test1.txt test2.txt
4,5c4,5            表示两个文件的第4行和第5行有不一样
< 02 3 4 5 6 7 8    "<"表示第一个文件test1.txt
< 09 10 11 12 13 14 15
---
> 2 3 4 5 6 7 8    ">"表示第二个文件test2.txt
> 9 10 11 12 13 14 15
cmp
报告文本差异位置
例:
[root@redhat root]# cmp test1.txt test2.txt
test1.txt test2.txt differ: byte 60, line 4    在文件中第60个字节、第4行处出现了不同
uniq
去除文件中重复的行
例:
[root@redhat root]# vi test1.txt
十月 2011
日 一 二 三 四 五 六
1
1
02 3 4 5 6 7 8
09 10 11 12 13 14 15
09 10 11 12 13 14 15
16 17 18 19 20 21 22
23 24 25 26 27 28 29
30 31
~
"test1.txt" 10L, 191C 已写入
[root@redhat root]# uniq test1.txt     去除test1.txt中的重复行
十月 2011
日 一 二 三 四 五 六
1
02 3 4 5 6 7 8
09 10 11 12 13 14 15
16 17 18 19 20 21 22
23 24 25 26 27 28 29
30 31
cut
显示文件中的某一列
例:
[root@redhat root]# vi cut_test
l u o
w e i
1 2 3
a b c
~
"cut_test" [新] 4L, 24C 已写入
[root@redhat root]# cut -f3 cut_test    显示cut_test第3列的内容
o
i
3
c
[root@redhat root]# vi cut1
luowei@test.com
luowei,luowei@test.com
admin,admin@test.com
[root@redhat root]# cut -f2 -d, cut1     显示cut1中以 , 分隔的第2列的内容
luowei@test.com
admin@test.com
[root@redhat root]# cut -c4-8 cut1        显示cut1中第4-8个字符
wei,l
in,ad
paste 将文本按列拼接
例:
[root@redhat root]# paste test1.txt test2.txt > test3.txt    将两个文件的内容水平拼接到test3.txt
[root@redhat root]# cat test3.txt
十月 2011 十月 2011
日 一 二 三 四 五 六 日 一 二 三 四 五 六
1 1
1 2 3 4 5 6 7 8
02 3 4 5 6 7 8 9 10 11 12 13 14 15
09 10 11 12 13 14 15 16 17 18 19 20 21 22
09 10 11 12 13 14 15 23 24 25 26 27 28 29
16 17 18 19 20 21 22 30 31
23 24 25 26 27 28 29
30 31
[root@redhat root]# cat test1.txt test2.txt > test4.txt    将两个文件的内容垂直拼接到test4.txt
[root@redhat root]# cat test4.txt
十月 2011
日 一 二 三 四 五 六
1
1
02 3 4 5 6 7 8
09 10 11 12 13 14 15
09 10 11 12 13 14 15
16 17 18 19 20 21 22
23 24 25 26 27 28 29
30 31
十月 2011
日 一 二 三 四 五 六
1
2 3 4 5 6 7 8
9 10 11 12 13 14 15
16 17 18 19 20 21 22
23 24 25 26 27 28 29
30 31
压缩
gzip
[root@redhat root]# gzip test1.txt //压缩
gunzip
[root@redhat root]# gunzip test1.txt.gz    //解压
[root@redhat root]# gzip -d test1.txt.gz    //解压
[root@redhat root]# zcat test1.txt.gz        //直接查看gz文件
十月 2011
日 一 二 三 四 五 六
1
1
02 3 4 5 6 7 8
09 10 11 12 13 14 15
09 10 11 12 13 14 15
16 17 18 19 20 21 22
compress, uncompress. unix上一种较老的压缩工具。
bzip2
[root@redhat root]# bzip2 test1.txt //压缩
bunzip2
[root@redhat root]# bunzip2 test1.txt.bz2        //解压
[root@redhat root]# bzip2 -d test1.txt.bz2    //解压
tar
[luowei@redhat luowei]$ tar -cvf test.tar test    //给test目录打包成test.tar
[luowei@redhat luowei]$ tar cvf aaa.tar allout test.tar        //将allout与test.tar文件打包到aaa.tar文件中
[luowei@redhat luowei]$ tar xvf test.tar        //解包
[luowei@redhat luowei]$ tar tf test.tar        //查看test.tar包文件中的内容
[luowei@redhat luowei]$ tar cvf bbb.tar stdout -C /home/luowei/test    将stdout打包成bbb.tar并存放到 /home/luowei/test目录下
[root@redhat root]# tar zcvf test.tar.gz test    //给test目录打包,并添加到压缩文件
[root@redhat root]# tar zxvf test.tar.gz        //对压缩文件解压并解包
[root@redhat root]# tar jcvf test.tar.bz2 test    //把test目录打包并压缩成bz2文件
[root@redhat root]# tar jxvf test.tar.bz2        //对打包压缩后的bz2解压并解包
dump
[root@redhat root]# dump -0 -f /tmp/dump1 /root/test    //将test目录备份到dump1文件
[root@redhat /]# dump -0u -f /tmp/bootdump /boot        //将顶层分区boot备份到bootdump文件
[root@redhat /]# cat /etc/dumpdates        //查看到分区的备份记录
[root@redhat root]# dump -0 -f /tmp/test2dump test2.txt        //备份文件test2.txt
[root@redhat root]# restore -tf /tmp/test2dump    //查看备份文件的内容
[root@redhat root]# restore -rf /tmp/dump1    //将dump1还原到当前文件夹下
bash
shell
shell:命令行解释器,是用户与系统沟通时的媒介。在unix系统中有各种shell,linux用bash为默认shell。系统可以使用的shell记录在 /etc/shells中。
如:
[root@redhat root]# cat /etc/shells
/bin/sh
/bin/bash
/sbin/nologin
/bin/bash2
/bin/ash
/bin/bsh
/bin/tcsh
/bin/csh
[root@redhat root]# a=luowei    //设置变量a的值为luowei
[root@redhat root]# echo $a    //显示a变量的值
luowei
[root@redhat root]# echo ${a}    //显示a变量的值
luowei
[root@redhat root]# a=$a123    //这样不能把a赋成luowei123
[root@redhat root]# echo $a
[root@redhat root]# a=luowei
[root@redhat root]# a=${a}123    //这样可以把a赋成luowei123
[root@redhat root]# echo $a
luowei123
[root@redhat root]# unset a    //删除a变量
环境变量
使用set可以查看本地变量和环境变量,如:
[root@redhat root]# set    //查看本地变量与环境变量
[root@redhat root]# env    //查看环境变量
预定义环境变量
系统通过预定义的环境变量来定义shell环境,用户可以用set或env查询当前的环境变量。
常用的预定义环境变量:
HOME:当前用户的主目录
PATH:当前用户的可执行文件搜索路径
LANG:程序应该使用的默认语言
PS1:行提示符
如:
[root@redhat /]# cd $home        //进入到家目录
[root@redhat root]# LANG=en    //更改在英文语系
[root@redhat root]# echo $PS1    //显示PS1中的值
[\u@\h \W]\$
\u:显示当前用户的名称
\h:仅列出主机名的第一个名字
\W:显示当前工作目录的最后个目录名称
[root@redhat root]# basename /etc/X11        //截取目录的最后一个目录名
[root@redhat root]# PS1='[\u@\H \w \A \#]\$'        //设置PS1
[root@redhat ~ 16:44 32]#
\H:显示完整的主机名
\w:显示当前完整工作路径,家目录用~表示
\A:显示当前时间
\#:显示当前是第几条命令
\$:显示提示符
[root@redhat root]# export a        //将a变量转换成环境变量
History
History:可以查询用户以前的过往操作
如:
[root@redhat root]# history    //列出用过的命令
[root@redhat root]# history 10        //列出最后使用过的10条指令
内存中记录的过往指令数由环境变量HISTSIZE而定。History表存储在内存中,在用户logout时会记录用户主目录下的.bash_history文件中。在下次login时载入。 .bash_history中的指令由环境变量中的HISTFILESIZE而定。
如:
[root@redhat root]# echo $HISTSIZE
1000
[root@redhat root]# echo $HISTFILESIZE
1000
[root@redhat root]# history –w        //将历史指令强制写入.bash_history文件中
调用过往指令
使用 ! 来调用过往指令:如
!!:重复执行上一条指令
!a:重复执行上一条以a为首的的指令
!number:重复执行上一条在history表中记录号码为number的指令
!-number:重复执行前第number条指令
可以用<ctrl+r>来在history表中查询过往指令
例:
[root@redhat root]# !e        //执行最近的以 e 开头的指令
[root@redhat root]# !$        //截取上一条指令的最后一个参数
127.0.0.1
-bash: 127.0.0.1: command not found
[root@redhat root]# ping !$    //直接ping 127.0.0.1,因为 !$ 截取到的是127.0.0.1
ping 127.0.0.1
PING 127.0.0.1 (127.0.0.1) 56(84) bytes of data.
Alias(别名)
例:
[root@redhat root]# alias        //列出系统中目前存在的别名
alias cp='cp -i'
alias l.='ls -d .* --color=tty'
alias ll='ls -l --color=tty'
alias ls='ls --color=tty'
alias mc='. /usr/share/mc/bin/mc-wrapper.sh'
alias mv='mv -i'
alias rm='rm -i'
alias vi='vim'
alias which='alias | /usr/bin/which --tty-only --read-alias --show-dot --show-tilde'
[root@redhat root]# alias a='ls -al'        //设置 a 为 ls –al 的别名
[root@redhat root]# unalias a        //删除a 这条别名
命令行表达式
命令行输出——" "
将一串字符当成一个字符串对待,如果字符串中包含特殊含义的字符(/,`,$,!),则转义。
命令行输出——' '
将一串字符当成一个字符串来对待,如果字符串中包含特殊含义的字符,不转义。
执行引用符——` `
引用命令的执行结果
例:
[root@redhat root]# echo "$PWD"
/root
[root@redhat root]# echo '$PWD'
$PWD
[root@redhat root]# ls -l `PWD`    //列出当前目录下的详细信息
数学运算——$[]
在中括号内的表达式会被数学计算
逸脱符——\
用于取消命令行中字符的特殊含义
用于表示一行未结束
例:
[root@redhat root]# echo $[1+4]
5
[root@redhat root]# echo \$[1+4]
$[1+4]
[root@redhat root]# mkdir a\ b        //建立一个名为"a b"的目录,\取消了空格的间隔作用
[root@redhat root]# ls \        // \表示一行未结束
> /home
luowei test1
[root@redhat root]#
命令行结束符——;
用于在一行内分隔几个独立命令,表示一行已结束,作用相当于回车键。
子shell激活——()
在小括号内的命令行表示激活一个子shell后在子shell中运行。
[root@redhat root]# ls;pwd;ls –a        //依次分别执行这三条指令
[root@redhat root]# echo $HOME
/root
[root@redhat root]# HOME=/usr
[root@redhat root]# echo $HOME
/usr
[root@redhat root]# HOME=/root
[root@redhat root]# (HOME=/usr)        //表示这个HOME=/usr 在子shell中运行
[root@redhat root]# echo $HOME
/root
[root@redhat root]#
逻辑运算符
&&:当前一条指令执行成功时再执行后一条指令
||:当前一条指令执行失败时再执行后一条指令
例:
[root@redhat root]# ls /home && touch /home/test1    //如果存在/home则建立/home/test1
[root@redhat root]# ls /root/test1 || mkdir /root/test1        //如果不存在/root/test1,则建立 /root/test1目录
[root@redhat root]# ls /root/test && echo "exist" || echo "no exist"
ls: /root/test: 没有那个文件或目录
no exist
[root@redhat root]#
定制登录shell
Bash在用户登录时从四个文件中读取环境,设定:
全局设置文件:/etc/profile ,    /etc/bashrc
用户设置文件:~/.bashrc    ,    ~/.bash_profile
其他shell设定文件
~/.bash_logout:在用户logout的时候自动执行。
~/.bash_history:用户login时自动读取其内容并加载到内存history记录中,logout时将内存history记录写入。
/etc/profile.d/*.sh:在/etc/profile中被执行,其中的环境设定,也会被全局引用。
常用快捷键
Ctrl+d:输入已结束。在shell下相当于一个exit。
Ctrl+c:键盘中断请求。
Ctrl+s & ctrl+q:暂停/恢复屏幕输出。
Ctrl+l:清屏,相当于clear。
Tab:自动补完命令行与文件名。
Tab键双击可以列出所有可能匹配的选择。
例:
[root@redhat ~ 20:22 35]#cat > test2.txt
cat > test2.txt
hello ,i'm luowei.
welcome to linux's world!        //ctrl+d结束输入
[root@redhat ~ 20:23 36]#cat test2.txt
cat > test2.txt
hello ,i'm luowei.
welcome to linux's world!
[root@redhat ~ 20:24 37]#
系统监视
了解系统状况
uname:显示系统信息
hostname:显示主机名
last:列出最近的用户登录
lastlog:列出每一个用户的最近登录情况
free:显示内存使用状况
vmstat:详细列出内存使用状况
top:系统监视器
例:
[root@redhat root]# top -d 3    //top默认是5秒刷新一次,这设置成3秒刷新一次
[root@redhat root]# top -b -n 2 > top.txt        //将top刷新两次的结果存到top.txt
[root@redhat root]# cat top.txt
进程
系统通过进程来完成工作,每个进程都有一个独立的进程号,系统通过调用进程号来调度操控进程。系统的原始的原始进程是init。init的PID总是1。一个进程可以产生另一个进程,除了init以外,所有的进程都有父进程。
例:
[root@redhat root]# ps –l        //列出与ps进程相关相关的进程
F S UID PID PPID C PRI NI ADDR SZ WCHAN TTY TIME CMD
4 S 0 2311 2309 0 75 0 - 1384 wait4 pts/0 00:00:00 bash
0 R 0 2408 2311 0 80 0 - 781 - pts/0 00:00:00 ps
[root@redhat root]# ps aux        //查看所有有效进程
[root@redhat root]# pstree –a        //以树状结构显示所有进程
[root@redhat root]# pstree –aup    //以树状结构显示所有进程,并显示所属用户和PID
控制进程
Kill,语法:kill [-signal] PID,向进程传送一个特定的讯号,默认为15,列出所有可以由kill传递的讯号。
[root@redhat root]# kill –l        //列出所有可以由kill –l 传递的讯号
[root@redhat root]# ps -ef|grep "top"        //筛选出所有含有top的指令
[root@redhat root]# kill -9 4634        //删除一个进程号为4634的进程
使用nice和renice改变进程的优先级。
[root@redhat root]# renice 10 4709        //将4709号进程的优先级改为4709
[root@redhat root]# ps -l | grep top        //显示top进程的详细信息
第二种修改进程优先级的方法,直接打开top命令,在top界面内直接敲入 R ,然后直接输入进程号,再输入优先级的值。
将进程丢入后台运行
Command & :将一个进程直接丢入后台运行。
nohup command &:将一个进程直接丢入后台运行,而且在该控制台退出后,进程仍不挂断。
Ctrl + z :将一个正在运行的前台进程暂停,并丢入后台。
例:
[root@redhat root]# top &        //将top进程放到后台执行
[1] 2405
[root@redhat root]# vi top.txt
CPU0 states: 0.0% user 0.1% system 0.0% nice 0.0% iowait 99.0% idle
CPU1 states: 0.0% user 0.0% system 0.0% nice 0.0% iowait 100.0% idle
Mem: 254664k av, 59076k used, 195588k free, 0k shrd, 22052k buff
48112k actv, 172k in_d, 224k in_c
Swap: 522104k av, 0k used, 522104k free 20612k cached
PID USER PRI NI SIZE RSS SHARE STAT %CPU %MEM TIME CPU COMMAND
1 root 15 0 472 472 420 S 0.0 0.1 0:04 0 init
2 root RT 0 0 0 0 SW 0.0 0.0 0:00 0 migration/0
………………                    //按下ctrl+z
[2]+ Stopped vim top.txt
[root@redhat root]#
工作
jobs:列出系统当前的后台进程
fg:将后台进程拉回前台
bg:激活后台暂停的进程
例:
[root@redhat root]# jobs –l    //查看后台作业
[1]- 2405 Stopped (tty output) top        //作业的状态为Stopped
[2]+ 2411 Stopped vim top.txt
[root@redhat root]# fg %1        //将后台的1号作业,放到前台来执行
[root@redhat root]# bg %1        //把1号作业,放到后台执行
[1]+ top &
[root@redhat root]# bg %1 ;jobs
[1]+ top &
[2]+ Stopped vim top.txt
[1]- Running top &
设备文件
linux沿袭Unix的风格,将所有设备认成一个文件。设备文件分两种:块设备文件(b),字符设备文件(c); 设备文件一般存放在 /dev 目录下。
常用的块设备文件
/dev/hd[a-t]:IDE设备
/dev/sd[a-z]:SCSI设备
/dev/fd[0-7]:标准软驱
/dev/md[0-31]:软raid设备
loop[0-15]:本地回访设备
ram[0-19]:内存

/dev/null:无限数据接收设备
/dev/zero:无限零资源
/dev/tty[0-31]:虚拟终端
/dev/ttyS[0-9]:串口
/dev/lp[0-3]:并口
/dev/console:控制台
/dev/fb[0-31]:framebuffer
例:
[root@redhat root]# cd /dev
[root@redhat dev]# ls -l > /dev/null     //将输出的设备送到null设备文件,功能:所有的输出被null丢弃掉。
[root@redhat dev]# ls -l > /dev/zero        //将当前的目录信息输出到zero设备
[root@redhat dev]# echo 123 > /dev/tty2    //将123输出到tty2虚拟终端
常用的符号连接设备文件
/dev/cdrom à /dev/hd[a-t],sd[a-z]
/dev/modem à /dev/ttyS[0-9]
/dev/pilot à /dev/ttyS[0-9]
设备文件的使用
cp /dev/fd0 /dev/fd1
将第一个软驱中的软盘拷入第二个软驱中的软盘
dd if=/dev/hda of=/root/mbr bs=512 count=1
备份第一个硬盘上的mbr为/root目录下mbr文件
dd指令是一个功能强大的copt命令,支持在拷贝文件的过程中转换文件格式,支持指定范围的复制,常用参数:
if=文件名:指定源文件
of=文件名:指定目标文件
bs=xxx:指定块的大小
count=n:指定复制块的数量
例:
[root@redhat dev]# dd if=/etc/passwd of=/root/passwd.bak //把/etc/passwd备份到/root/passwd.bak
3+1 records in
3+1 records out
[root@redhat dev]# dd < /root/install.log > /root/install.log.bp //备份install.log文件
[root@redhat root]# rm -f install.log    //删除
[root@redhat root]# dd < install.log.bp > /root/install.log    //还原
[root@redhat root]# dd < /dev/sda1 > /opt    //备份sda1这个分区
[root@redhat root]# dd < /dev/sda > /root/mbr bs=512 count=1    //备份第一个硬盘的第一个扇区
1+0 records in
1+0 records out
mknod建立设备文件
语法:mknod 文件名 文件类型 主号 从号
主号与从号可以在 /usr/src/linux-2.4/Documentation/devices.txt中找到。
[root@redhat root]# mknod /dev/hda55 b 3 5 //创建一个hda55设备
分区
[root@redhat root]# fdisk -l /dev/sda    //列出硬盘sda分区的详细信息
[root@redhat root]# fdisk /dev/sda        //操作硬盘sda分区
The number of cylinders for this disk is set to 1044.
There is nothing wrong with that, but this is larger than 1024,
and could in certain setups cause problems with:
1) software that runs at boot time (e.g., old versions of LILO)
2) booting and partitioning software from other OSs
(e.g., DOS FDISK, OS/2 FDISK)
Command (m for help): m
Command action
a toggle a bootable flag
b edit bsd disklabel
c toggle the dos compatibility flag
d delete a partition
l list known partition types
m print this menu
n add a new partition
o create a new empty DOS partition table
p print the partition table
q quit without saving changes
s create a new empty Sun disklabel
t change a partition's system id
u change display/entry units
v verify the partition table
w write table to disk and exit
x extra functionality (experts only)
Command (m for help):
[root@redhat root]# partprobe     //让分区表立刻生效
[root@redhat root]# mkswap /dev/sda6        //(首先用"t"改变分区的id为82,再)把sda的第6个分区格式化成swap分区
[root@redhat root]# free        //查看内存
[root@redhat root]# dd < /dev/zero > /tmp/swap bs=4k count=100    //创建一个100M的swap文件
[root@redhat root]# mkswap /tmp/swap        //格式化为swap文件格式,并加入到swap分区
[root@redhat root]# free
[root@redhat root]# swapoff /tmp/swap    //将这个swap文件脱离swap分区
文件系统
不同的文件系统存放、搜索文件的方式都有不同,Linux支持多种文件系统的读写。linux自身最主要使用的是ext2/ext3文件系统。
ext2/ext3文件系统支持rwx权限及文件属性(attributes); ext2/ext3文件系统采用block+inode方式存放文件;ext2/ext3文件系统上有一块空间被称为超级块(superblock)用于存放文件系统的元数据,诸如卷标名、block数、inode数等等;inode存放文件的元数据,包含文件权限、属性、更改时间等等数据。
例:
[root@redhat root]# ls –il    //列出目录下的文件的索引结点号以及详细信息
[root@redhat root]# df    //查看硬盘分区信息
[root@redhat root]# dumpe2fs /dev/sda1    //查看第一个分区的超级块信息
ReiserFS文件系统
一个非常优秀的文件系统
可轻松管理上百G的文件系统
先进的日志机制
高效的磁盘空间利用
独特的搜寻方式
文件属性
在ext2/3文件系统中,对每一个文件,还提供额外的属性支持
用户可以用lsattr来检查文件的属性
系统用户可以用chattr来改变文件的属性。 +号添加、-号去除
例:
[root@redhat root]# chattr +i install.log    //给文件设定一个i属性,设定之后,文件无法被删除悠
[root@redhat root]# lsattr install.log
----i-------- install.log
[root@redhat root]# chattr -i install.log    //删除文件的i特殊属性
ext3文件系统
ext3文件系统即一个添加了日志功能的ext2,与ext2文件系统无缝兼容
ext2文件系统可以通过增加日志的方式简单地升级成为ext3文件系统
ext3文件系统支持三种日志模式:
规则(默认,公记录元数据);日志化(将数据象元数据一样记录入日志) ;写回(只在fsck时发生)

[root@redhat root]# cat /proc/filesystems        //查看当前系统所启用的文件系统
创建文件系统
常用的创建文件系统的工具:
mkfs:可以用于创建各种文件系统,由-t参数指定。
mke2fs:创建ext2/3文件系统,支持指定block大小等功能。
例:
[root@redhat root]# mkfs -t ext2 /dev/sda5    //在sda5分区上创建ext2文件系统
[root@redhat root]# dumpe2fs -h /dev/sda5    //查看sda5的超级块信息
[root@redhat root]# mke2fs -b 2048 /dev/sda5    //给sda5创建ext2文件系统,并指定块大小为2048kB
[root@redhat root]# mke2fs -i 1028 /dev/sda5    //把索引结点的大小设置为1028kB
[root@redhat root]# mke2fs -L data /dev/sda5    //为sda5创建一个名为-L的卷标
[root@redhat root]# mke2fs -j /dev/sda5        //给sda5创建ext3文件系统
[root@redhat root]# mount /dev/sda5 /opt        //将sda5挂载到/opt目录下
[root@redhat root]# cd /opt
[root@redhat root]# touch test
[root@redhat root]# ls
[root@redhat root]# umount /opt        //卸载/opt目录
mount使用
1.-t 文件系统类型:用于指定挂载文件系统的类型,一般这个参数是必须的。
2. 参数:补允追加的参数
3.ext2文件系统默认采用的参数:rw、suid、dev、exec、auto、nouser、async
例:
[root@redhat root]# mount -o ro /dev/sda5 /opt        //挂载sda5到/opt,且只读
[root@redhat root]# mount /dev/cdrom /mnt        //挂载光驱
[root@redhat root]# mount /dev/fd0 /mnt        //挂载软驱
[root@redhat root]# mount -o loop,ro /var/boot.iso /mnt    //挂载ISO镜像
[root@redhat root]# vi /etc/fstab    //编辑fstab文件
LABEL=/ / ext3 defaults 1 1
none /dev/pts devpts gid=5,mode=620 0 0
none /proc proc defaults 0 0
none /dev/shm tmpfs defaults 0 0
/dev/sda2 swap swap defaults 0 0
/dev/cdrom /mnt/cdrom udf,iso9660 noauto,owner,kudzu,ro 0 0
/dev/fd0 /mnt/floppy auto noauto,owner,kudzu 0 0
[root@redhat root]# mount        //查看当前挂载中的文件系统
[root@redhat root]# cat /etc/mtab    //查看当前挂载中的文件系统
[root@redhat root]# cat /proc/mounts        //查看当前挂载中的文件系统
[root@redhat root]# e2label /dev/sda5    //查看sda5的卷标
[root@redhat root]# e2label /dev/sda5 data        //给sda5创建一个卷标
[root@redhat root]# mount -L data /opt    //使用卷标将sda5挂载到/opt上
[root@redhat root]# umount /opt        //卸载/opt下的挂载设备
[root@redhat root]# umount /dev/sda5    //卸载sda5设备
文件系统维护
fsck/filesystem check:用于检查和修复文件系统。e2fsck:检查与修复ext2文件系统。
系统在启动时自动会被检查。
tune2fs:更改ext2文件系统属性。
resize2fs:更改ext2文件系统的大小。
parted:更改多种文件系统大小。
例:
[root@redhat root]# fsck -y /dev/sda6    //检测sda6分区
[root@redhat root]# tune2fs -j /dev/sda5    //把sda5转换为ext3文件系统
[root@redhat root]# rpm -q autofs        //查看系统是否安装了autofs(自动挂载套件)
自动挂载
系统通过autofs服务自动挂载文件系统,需要后台的automount进程,autofs服务的开闭由/etc/init.d/autofs脚本控制,主要应用于软驱与光驱等场合,如果该设备一段时间没有被使用,autofs会自动卸载。
[root@redhat root]# cat /etc/auto.misc    //查看自动挂载设备
[root@redhat root]# service autofs restart    //重启自动挂载服务
[root@redhat root]# cat /etc/auto.master        //自动挂载目录集合
真正挂载目录的为 auto.master集合中的目录+auto.misc中的路径。
安装中的窗口切换
在安装过程中,用Alt+Fn键来切换显示窗口:
Alt+F1:安装对话框
Alt+F2:一个bash
Alt+F3:安装日志
Alt+F4:与系统、核心相关的信息
Alt+F5:其他讯息,诸如mke2fs,grub的标准输出
Alt+F7:X图形化显示
例:
[root@redhat root]# sestatus        //查看SELinux的状态
[root@redhat root]# vi /etc/sysconfig/selinux        //编辑selinux文件
设置:SELINUX=disabled        //设置为不可用
Linux的计划任务
at命令:指定一个时间执行一个任务
cron机制:根据一个时间表自动执行任务
anacron机制:在一个指定时间间隔错过后自动执行任务
at命令需要系统后台有一个atd进程
at:安排延时任务
atq:查询当前的等待任务
atrm:删除等待任务
batch:以一个低优先级延时执行任务
例:
[root@redhat root]# ps -ef|grep atd        //查看atd是否启动
[root@redhat root]# /etc/init.d/atd restart        //重新启动atd服务
[root@redhat root]# chkconfig --level 2345 atd on //设置系统启动运行等级是2345时,启动atd服务
[root@redhat root]# at now +1 min    //设置一分钟后的任务
at> echo "hello" > /dev/tty2        //将hello输出到tty2
at> <EOT>        //ctrl+D
job 4 at 2011-11-21 13:44
然后在linux系统中按下快捷键Alt+f2,显示第2个终端可以看到:Redhat login: hello 。
[root@redhat root]# at 13:55        //设置13:55后的计划任务
at> echo "this is test" > /root/test.txt        //将内容输出到 /root/test.txt
at> <EOT>        //ctrl+D
job 5 at 2011-11-21 13:55
[root@redhat root]# cat /root/test.txt
this is test
[root@redhat root]# at 1:00 2011-11-22        //在2011-11-22 1:00自动关闭系统
at> /sbin/shutdown -h now        //自动关闭系统
at> <EOT>
job 6 at 2011-11-22 01:00
[root@redhat root]# cd /var/spool/at        //进到at目录下
[root@redhat at]# ls
a0000101502a34 a0000201502a37 a0000301502a37 a0000601502cdc spool
[root@redhat at]# cat a0000601502cdc
…………

/sbin/shutdown -h now
[root@redhat at]# atq        //查询系统有多少个正在等待被执行的任务
1 2011-11-21 13:40 a root
2 2011-11-21 13:43 a root
3 2011-11-21 13:43 a root
6 2011-11-22 01:00 a root
[root@redhat at]# at now +5 min
at> echo "test" > /dev/tty2
at> <EOT>
job 7 at 2011-11-21 14:16
[root@redhat at]# atq
1 2011-11-21 13:40 a root
2 2011-11-21 13:43 a root
3 2011-11-21 13:43 a root
6 2011-11-22 01:00 a root
7 2011-11-21 14:16 a root
[root@redhat at]# atrm 3    //删除工作号为3的任务
[root@redhat at]#
You have new mail in /var/spool/mail/root
[root@redhat at]# mail
……
& 8
Message 8:
From root@localhost.localdomain Mon Nov 21 14:20:00 2011
Date: Mon, 21 Nov 2011 14:20:00 +0800
From: root <root@localhost.localdomain>
Subject: Output from your job 8
To: root@localhost.localdomain
hi luowei
[root@redhat at]# batch    //用于创建大批量的任务
warning: commands will be executed using (in order) a) $SHELL b) login shell c) /bin/sh
at> echo "hi" > /dev/tty2
at> <EOT>
job 9 at 2011-11-21 14:28
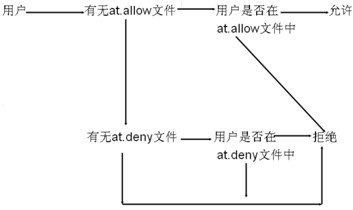
at命令的使用控制
at命令的使用控制文件
/etc/at.allow
/etc/at.deny
基于用户的使用控制
at命令的控制流程
例:
[root@redhat at]# vi /etc/at.deny
test
jack
~
[root@redhat at]# su - jack
[jack@redhat jack]$ at
You do not have permission to use at.
[jack@redhat jack]$